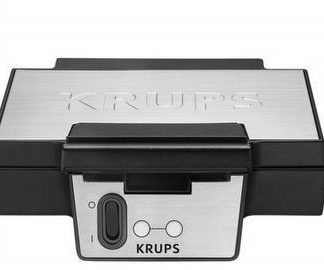
Sale!

Lakeland waffle Maker

(4 customer reviews)

$39.99 $29.99

Electric waffle maker with wells to catch drips of batter. The size of waffles is 9 x 10cm. Recipes included

Category: Tags: ,

Description

Just start your cooking journey with this great electric waffle maker with wells to catch drips of batter.

Yo can achieve delicious results with less mess and short time. It will be ready to cook in only 3 minuter. We also include Sweet and savory recipes.

The size of waffles is 9 x 10cm

4 reviews for Lakeland waffle Maker

  1. Quenti

    Wel, What can I say about Lakeland Waffle No Mess Maker

    I bought it to use in my office. We all like sweet waffles here.

    This plate is very good, and it does heat up when the batter is cooled. The outer coating is a bit thin and hard to get a good bead of batter through, but if you are having a few, it does get nice and golden with a little extra batter. The inside, however, is still hot. I’ve had the sauce, and I have to say it makes an amazing base sauce for waffles.

    The crust of your choice should be the same – cornflake, brown, wheat, or whatever- but make sure it has good thickness.

    If you have a big enough frying pan, and the base does not need to be the same thickness, you might be good with cornflake or brown – use a larger skillet so the batter can go through better. The crust is very good for base sauces, as well.

  2. Thomas

    At the beginning, I was very disappointed when the waffles were a bit dry, so not sure how to fix it. My favorite type of waffle recipe is to add all of the ingredients at once.

    But all of this my fault – a noob in cooking is always doing something bad.

    This is a fabulous quick waffle recipe. I just made a double batch of it and I am very glad I took the time to read the reviews, as the results were fantastic. I also added a little vanilla extract and made sure the batter was all the way together.

    It’s so easy to make and so darn good that I won’t be looking at another recipe on here. I think it’d be a great idea to try making this with a little more butter and a little cream – that’ll keep your waffle from being too soggy on the sides.

    I think the extra fat will add a nice crispy edge to the waffle and a nice chewiness to the top. It’s also so nice that I can take my kids to work without a bunch of grease smearing across their faces!

  3. Renata

    This is a fabulous maker that can help you prepare quick and delicious waffles with included recipe.

    I just made a double batch of it and I am very glad I took the time to read the reviews, as the results were fantastic. I also added a little vanilla extract and made sure the batter was all the way together.

    It’s so easy to make and so darn good that I won’t be looking at another recipe on here. I think it’d be a great idea to try making this with a little more butter and a little cream – that’ll keep your waffle from being too soggy on the sides. I think the extra fat will add a nice crispy edge to the waffle and a nice chewiness to the top. It’s also so nice that I can take my kids to work without a bunch of grease smearing across their faces!

    The only complain is the price. I think it could cost a little but less. This is why I gave 4 start instead of 5

  4. River Bonner

    I recently traveled and decided to take my love for waffles to the next level by investing in a Lakeland waffle maker. It arrived quickly at my hotel in Portland, Oregon, and I’m thrilled with its performance. The device heats up fast and cooks evenly, resulting in perfect golden brown waffles every time. One feature that sets it apart from competitors is the adjustable browning control, which allows for customization based on individual preferences. And at $29.99, this affordable price point makes it an exceptional value for money. I highly recommend giving Lakeland’s waffle maker a try – its speedy cooking time, even heat distribution, and compact size make it a standout appliance in the market.

    As for current events, the Citizenship Amendment Act has sparked mixed reactions globally. While some view it as necessary to safeguard religious minorities, others believe it violates principles of secularism and equality. Regardless of opinion, we must remain hopeful and optimistic about the future – only then can we create positive change in our communities and beyond.

    Lakeland’s commitment to innovation and quality is admirable. Their products are designed with customers’ needs in mind, resulting in appliances that offer exceptional performance and value for money. It’s no wonder they’re a trusted household name across the UK and beyond.

Add a review

Your email address will not be published. Required fields are marked *

Frequently Asked Questions:

How can I schedule regular cleanings using my iRobot Roomba J7?

To schedule regular cleanings with your iRobot Roomba J7, follow these steps:

1. Connect the Roomba to Wi-Fi: Ensure that you have successfully connected your Roomba J7 to your home Wi-Fi network. This allows you to use the iRobot Home app for scheduling and monitoring cleaning tasks.

2. Download the iRobot Home app: If you haven't already, download and install the iRobot Home app on your smartphone or tablet. The app is available for both iOS and Android devices.

3. Register and sign in to the app: Create an account by providing your email address and password. Then, sign in to your iRobot Home app using these credentials.

4. Connect your Roomba J7 to the app: In the iRobot Home app, click "Add" at the top of the screen, then choose "Vacuum." Search for your Roomba J7 and connect it to your account by following the on-screen prompts.

5. Schedule a cleaning task: Once your Roomba J7 is connected to the app, tap the "Clean" button in the center of the home screen. Here you can select a specific room or area that you want your Roomba to clean. Alternatively, you can choose "Custom" and create a customized cleaning schedule based on your preferences.

6. Set up a recurring cleaning schedule: To set up a regular cleaning schedule, tap the "Scheduled Cleaning" button at the bottom of the screen. You'll see options for setting daily, weekly, or monthly schedules. Select your desired frequency and time slots, then confirm your changes by tapping "Save."

Your Roomba J7 will now automatically start its cleaning tasks according to the schedule you have set up in the iRobot Home app. You can always adjust or cancel your scheduled cleanings as needed.

What is the best cleaning mode for my Roborock S7 MaxV Ultra to use on hardwood floors?

The best cleaning mode to use for hardwood floors with your Roborock S7 MaxV Ultra is the "Quiet Mode" and select "Hard Floor" in the app or on the robot itself. This will ensure that the robot uses the appropriate suction power and sweeping pattern designed for hard floor surfaces, and minimize any potential damage caused by excess force from brushes or vibrations.

How do I set up and use my Xiaomi Roidmi Eve Plus for the first time?

Here's a step-by-step guide to help you set up and start using your Xiaomi Roidmi Eve Plus for the first time:

1. **Charge the battery:** Before starting, make sure the battery is fully charged. Connect the charging cable to the power outlet and attach the other end to the EVA Plus vacuum cleaner. The charging LED indicator will light up during the charging process, which usually takes about 2-3 hours for a full charge.

2. **Install the dustbin:** After charging, remove the dustbin from its compartment on the back of the unit. To install it, simply press the lock button at the bottom and insert it into the designated slot until you hear a click. Ensure that the dustbin is correctly installed before proceeding with the setup process.

3. **Download the Roidmi App:** Visit the App Store or Google Play Store on your smartphone and search for "Roidmi" to download the official Roidmi app. Install it, and then open it to get started.

4. **Pair your EVA Plus with the app:** Open the Roidmi app on your smartphone and tap on "Device" located at the bottom of the screen. Select "New device," then choose "EVA+" from the list. You will be prompted to enter a four-digit code displayed on your EVA Plus vacuum cleaner's LCD screen. Enter the code correctly, and your device will automatically connect to your smartphone via Bluetooth.

5. **Configure settings:** Once connected, you can customize various settings such as suction power mode, scheduling automatic cleaning times, and more within the app. You can also access helpful tips and troubleshooting guides if needed.

6. **Begin using your EVA Plus vacuum cleaner:** With everything set up correctly, you're now ready to start using your Xiaomi Roidmi Eve Plus vacuum cleaner! Simply press the power button on the device or use the app to control it remotely. Clean your floors and enjoy a hassle-free cleaning experience with your new Xiaomi Roidmi Eve Plus vacuum cleaner!

Can I change the virtual walls' battery on my Roborock S7 MaxV robot vacuum?

Yes, you can change the virtual wall's battery on your Roborock S7 MaxV robot vacuum. To do this, follow these steps:
1. Turn off the Roborock S7 MaxV robot vacuum and unplug it from the charging dock.
2. Locate the virtual wall that needs its battery changed. It is usually attached to a base station or charging dock with a cable connected to it.
3. Press and hold the power button on the virtual wall for 5-6 seconds until you hear a beeping sound, indicating that the virtual wall has entered sleep mode.
4. Unplug the virtual wall from its charging base or station.
5. Remove the battery cover of the virtual wall by pressing the small buttons located on both sides of the virtual wall.
6. Carefully remove the old battery and insert a new one in the same orientation as the previous one. Make sure you use a compatible battery with the correct voltage and capacity.
7. Replace the battery cover and press it back into place until you hear a click, ensuring that it is properly secured.
8. Plug the virtual wall back into its charging base or station and wait for it to charge completely. It may take up to 2 hours for the charging process to complete.
9. Once the virtual wall has been fully charged, press the power button again to wake it up. You should hear a beeping sound indicating that the virtual wall is now active.
10. Turn on your Roborock S7 MaxV robot vacuum and resume using the virtual walls as needed.